Import Objects - ASE - Importing To Muvizu From SketchUp
This is just a basic guide for importing objects into Muvizu using Google Sketchup.
Download Google Sketchup here!
Find out how to use the standard Muvizu exporter plugin with the latest sketchup version here!
Sketchup ASE Exporter here -> Right click link and select save link As http://www.muvizu.com/download/muvizuaseexporter.rb
You may also want to use the new ZiggyMesh exporter which removes the collision from your object to stop things bumping into each other in Muvizu. Download this new plugin here! (To install this, go to Window -> Extension Manager -> Install Extension and choose this file.)
(You could also use the old ZiggyMesh tiny collision exporter: http://www.rodneyandberty.com/#!downloads/rmmoz However, you'll have to use the older Sketchup 8 )
Google Sketchup is quite handy for designing custom objects and making things that you want in Muvizu, but are not in Muvizu currently. In the following, I will try to explain the easiest way to make an object and import it with no fuss into Muvizu. I hope you find this helpful and helps inspire you to make your own objects and sets for Muvizu.
Let's begin!
1. Open My Computer, or click the Start button, then My Computer if it's not on your desktop. Go to your hard drive. This is usually labelled C: Now double click the C: icon and right click then go to the 'New' option. Make a new folder and call it 'UT3'.
2. Now open Microsoft Paint and create a new file. Resize this initial white box to 256x256 pixels. Use the Fill in Tool to colour it pink. Now save this file as 'Toto.bmp' (256 Bitmap) in the newly created folder UT3.
3. Start up Google Sketchup and select a template if you have the welcome screen displayed. I usually just stick to Metres. For a nice simple object to start off on, let's build a cuboid. Select the Rectangle tool from the top.
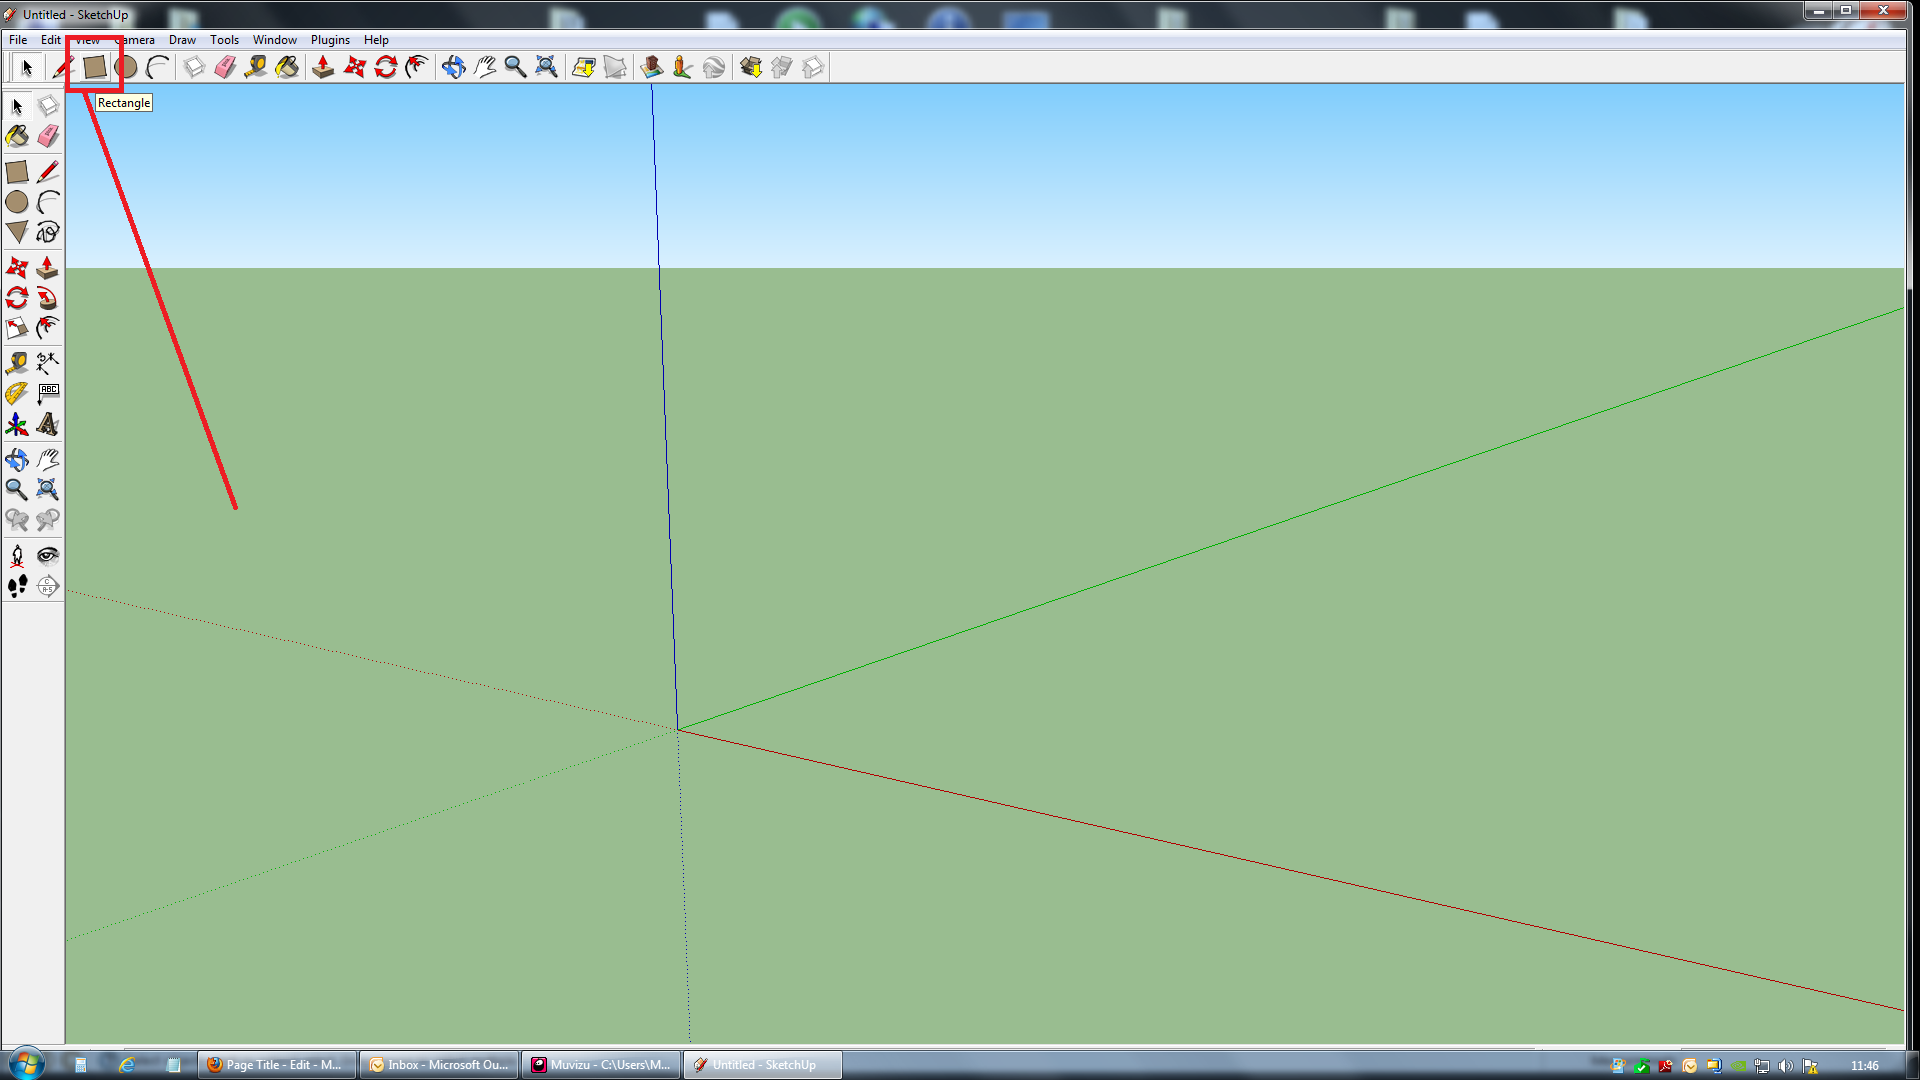
4. Now click and drag the tool across the floor to create a rectangle shape.

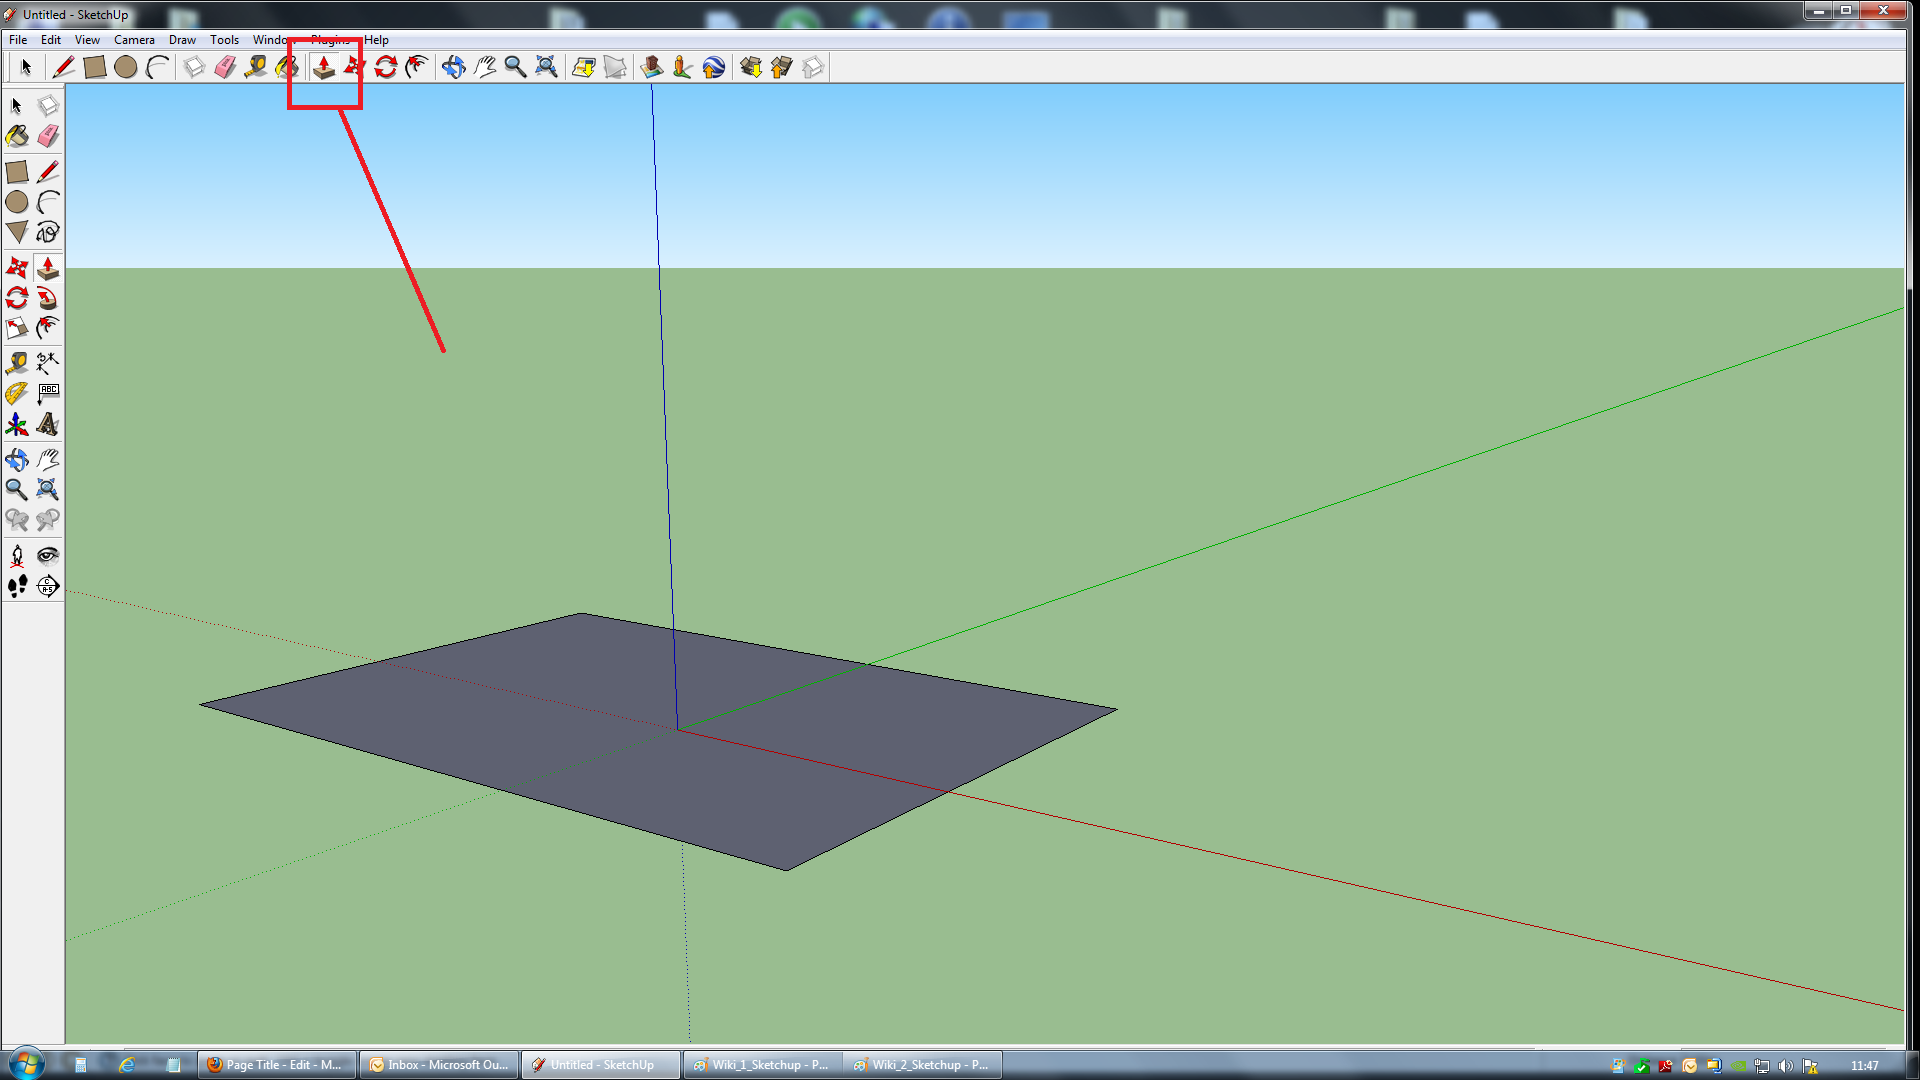
5. Click the Push/Pull Tool from the top and click once on the top face of your cuboid and then move your mouse in an upwards direction and you should see your flat rectangle turn into a 3D cuboid shape, then click again once you have a rough cuboid shape to finish.
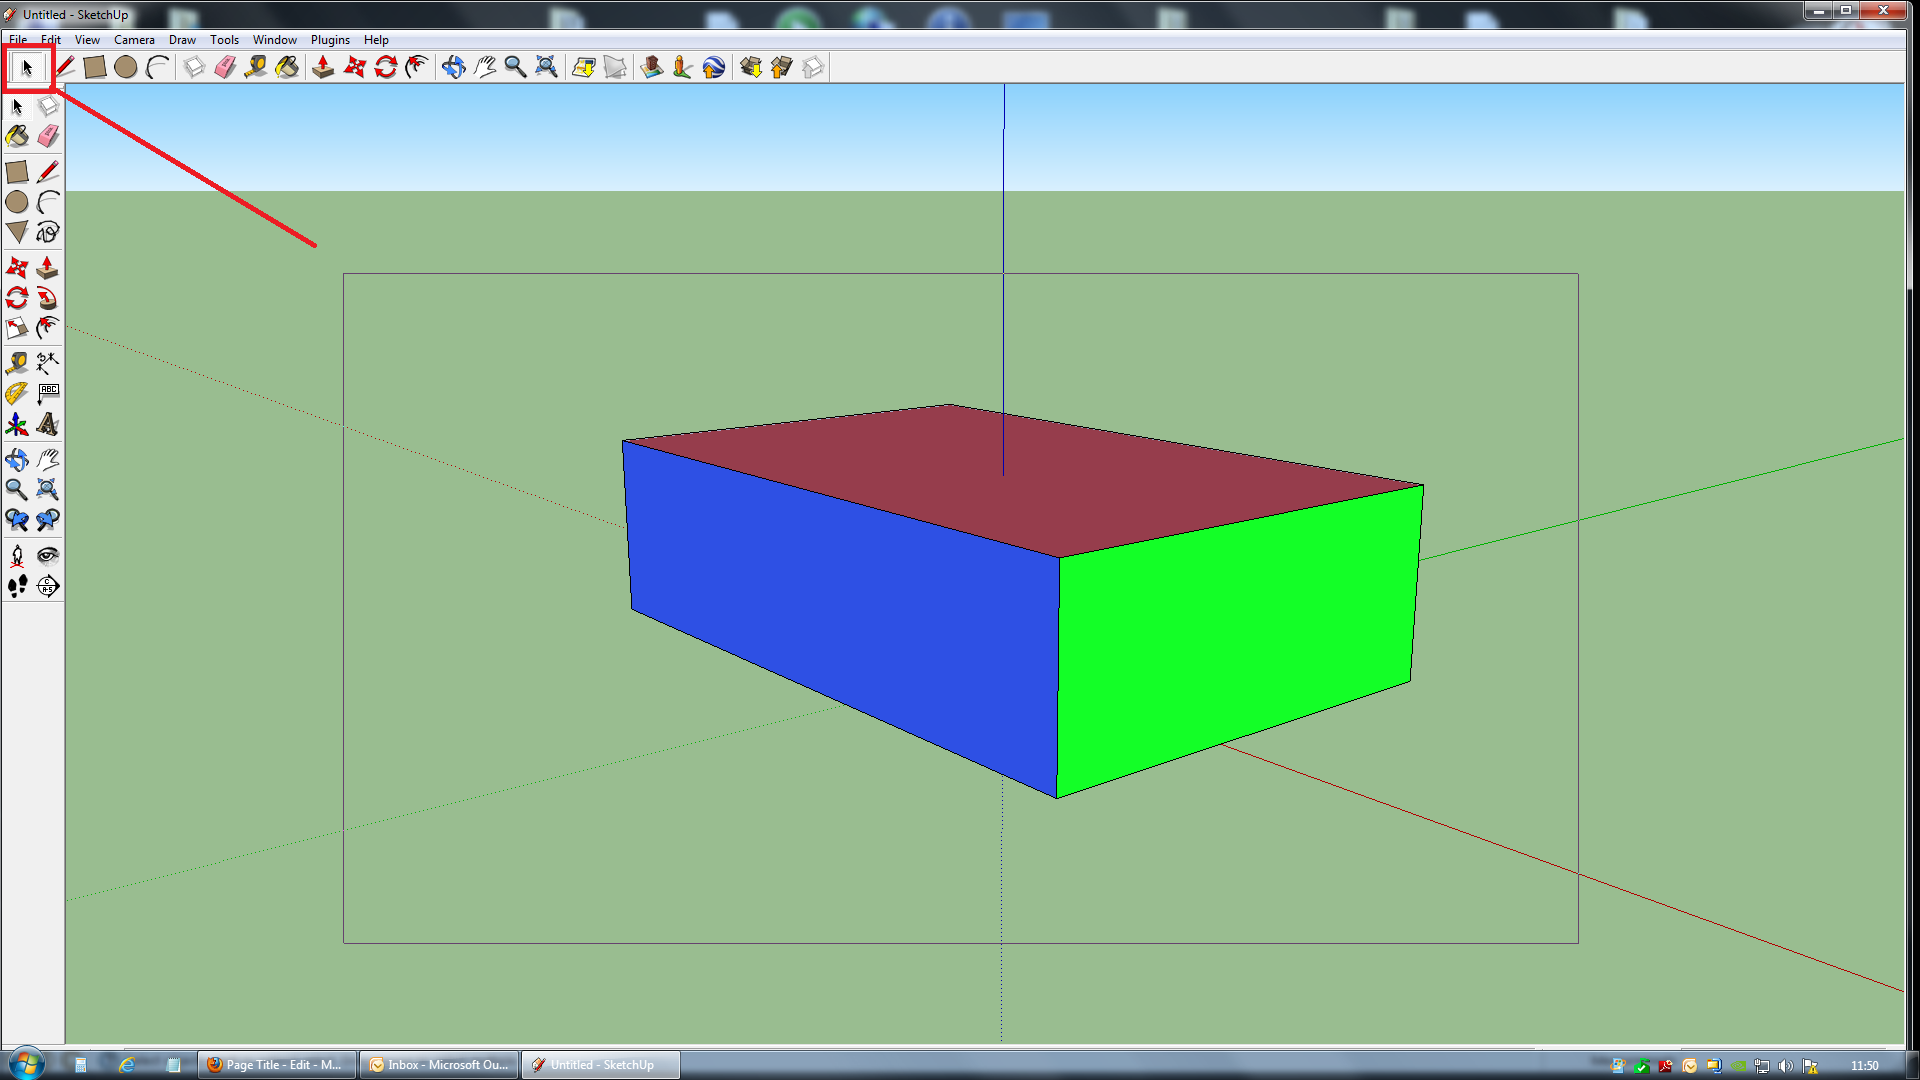
6. You can now use the Paint Bucket Tool from the top options bar to colour your object or give it textures if you so wish. [If you want to add custom textures to objects, and let's face it, who doesn't ;) simply use the Create Material button on the right hand side when you open the Paint Bucket Tool] From here you can select the 'Browse for Material Image File' button to select your own custom textures and images to add to your object. (*Please remember! The image files you select here like to be 256x256 in pixel size and be '.bmp' (256 Bitmap) files just like our initial Toto.bmp file!)
- I made the top face red, one face blue and one face green. I left the other sides blank so later on we can see what happens to blank faces.

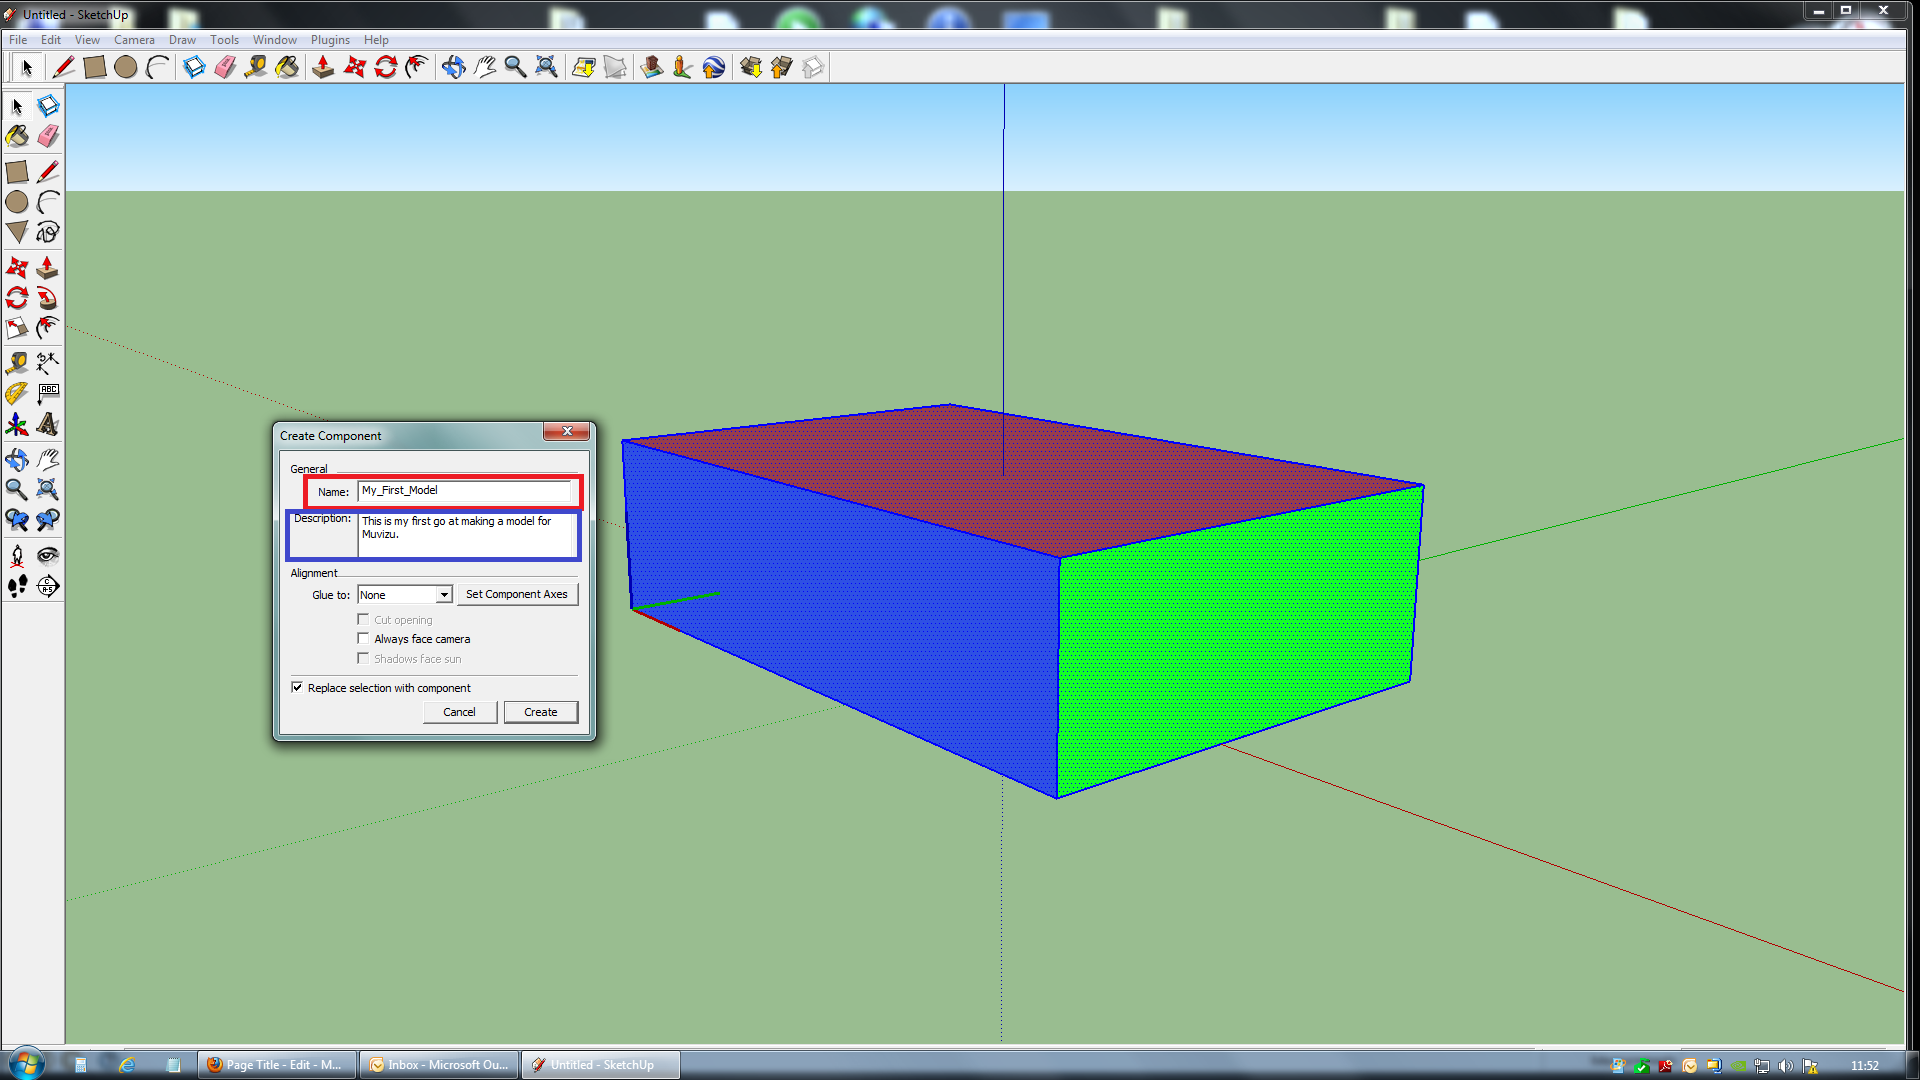
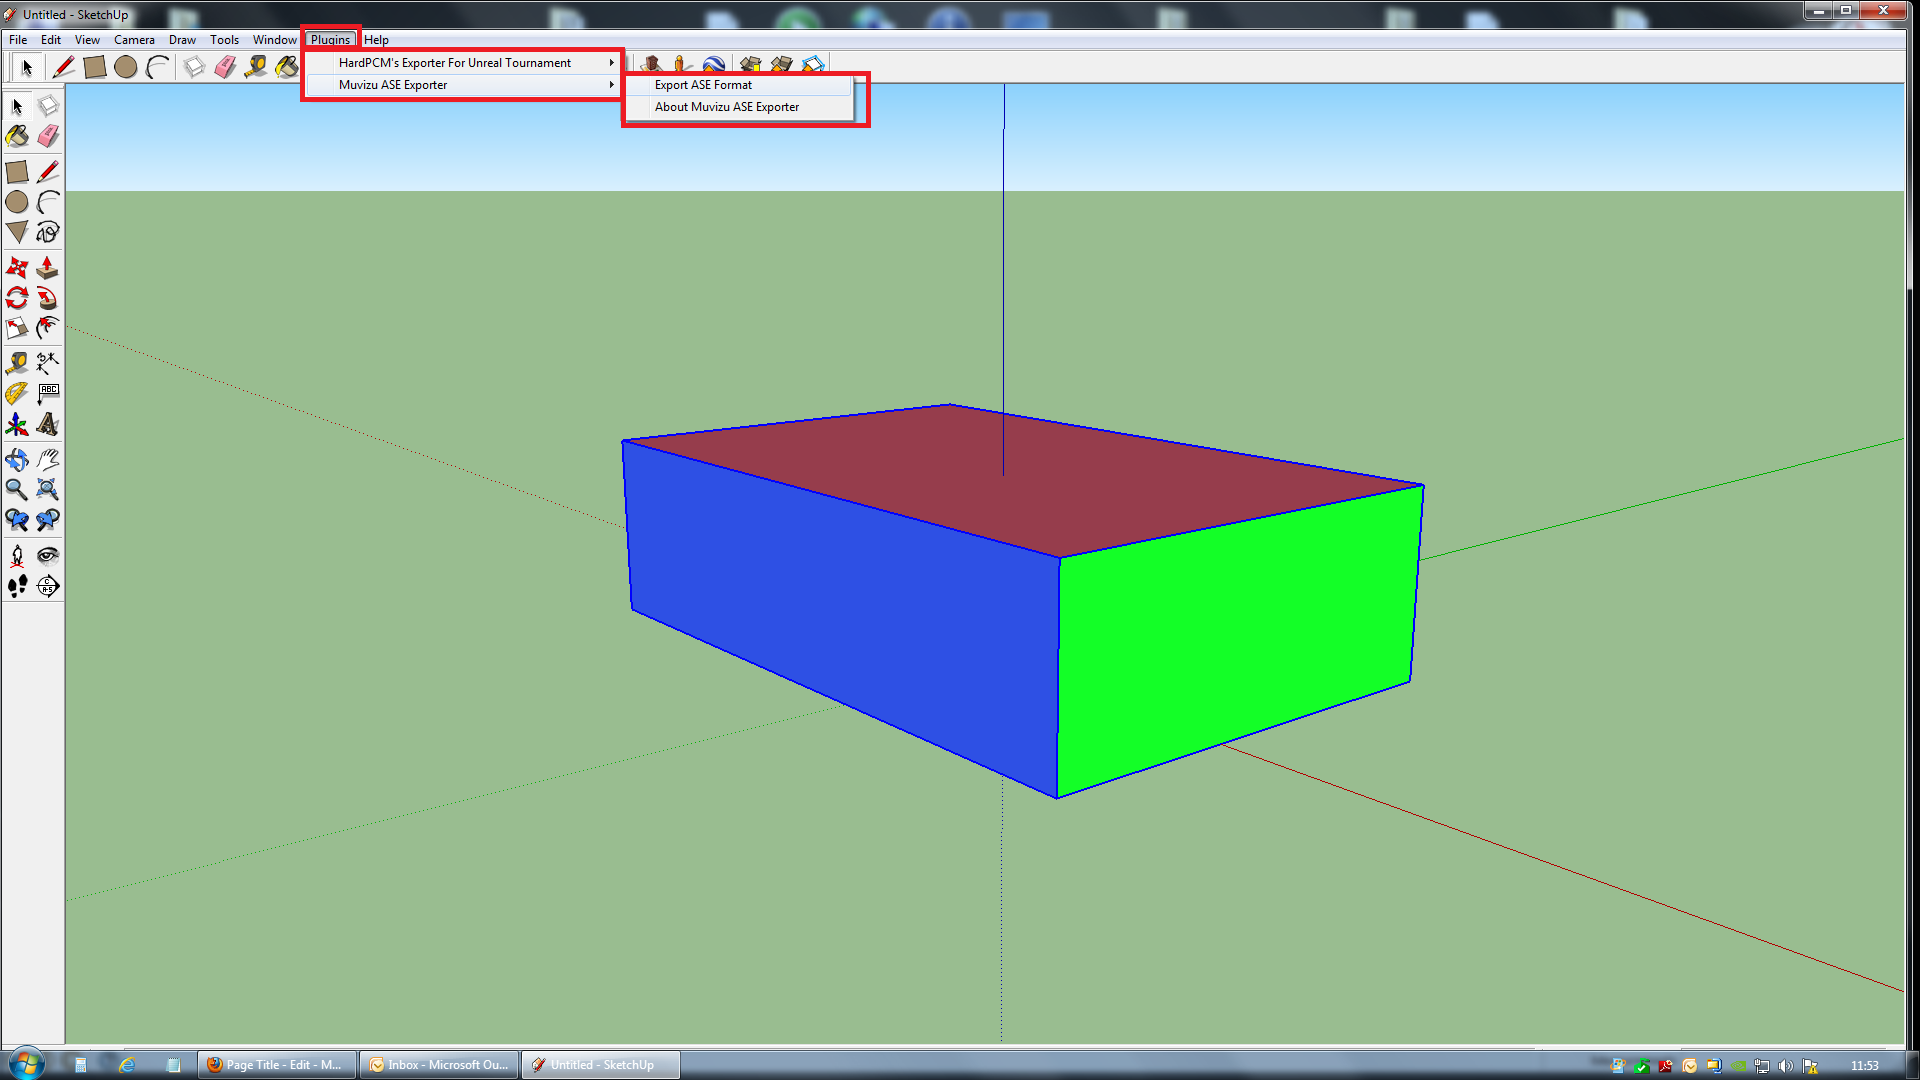
7. Once you have your colours/materials in place, it's time to make our first Component! Select the Pointer tool from the top left of the options bar and drag a selection box around our newly created colourful cuboid. It should now have a nice blue outline showing us that it is now selected. Now go to the top options bar and click the Create Component Tool.
8. A pop up box should now display and ask what you want to call your Component. Name it what you want and also add a description if you wish, although the description is not necessary. Click create.
9. Now click on the Plugins tab. The option we want is called 'Muvizu Ase Exporter' and from that menu then go to 'Export Ase Format'. A new box will appear and give you some options.
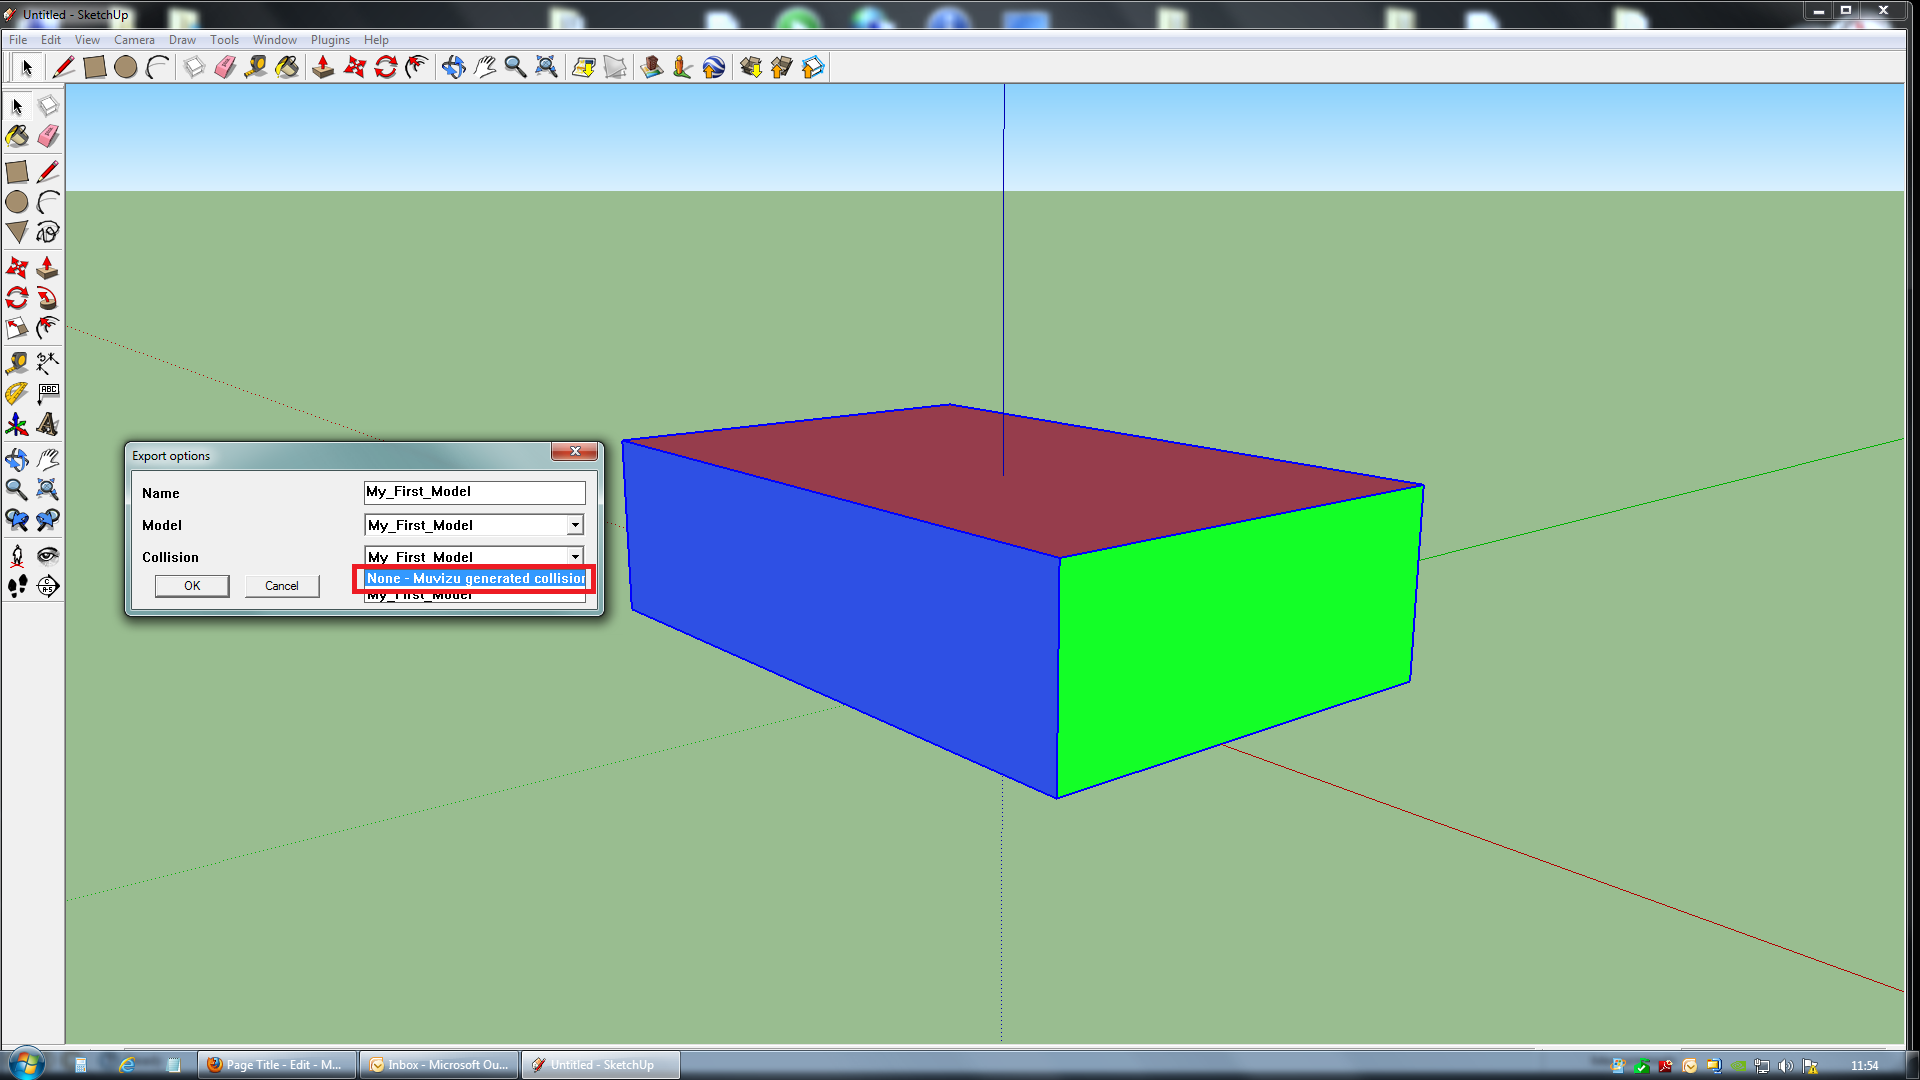
10. I have picked the easiest to use options, all you need to do here is name your model and tell Sketchup you don't want collision (Muvizu will add the collision for you later!)
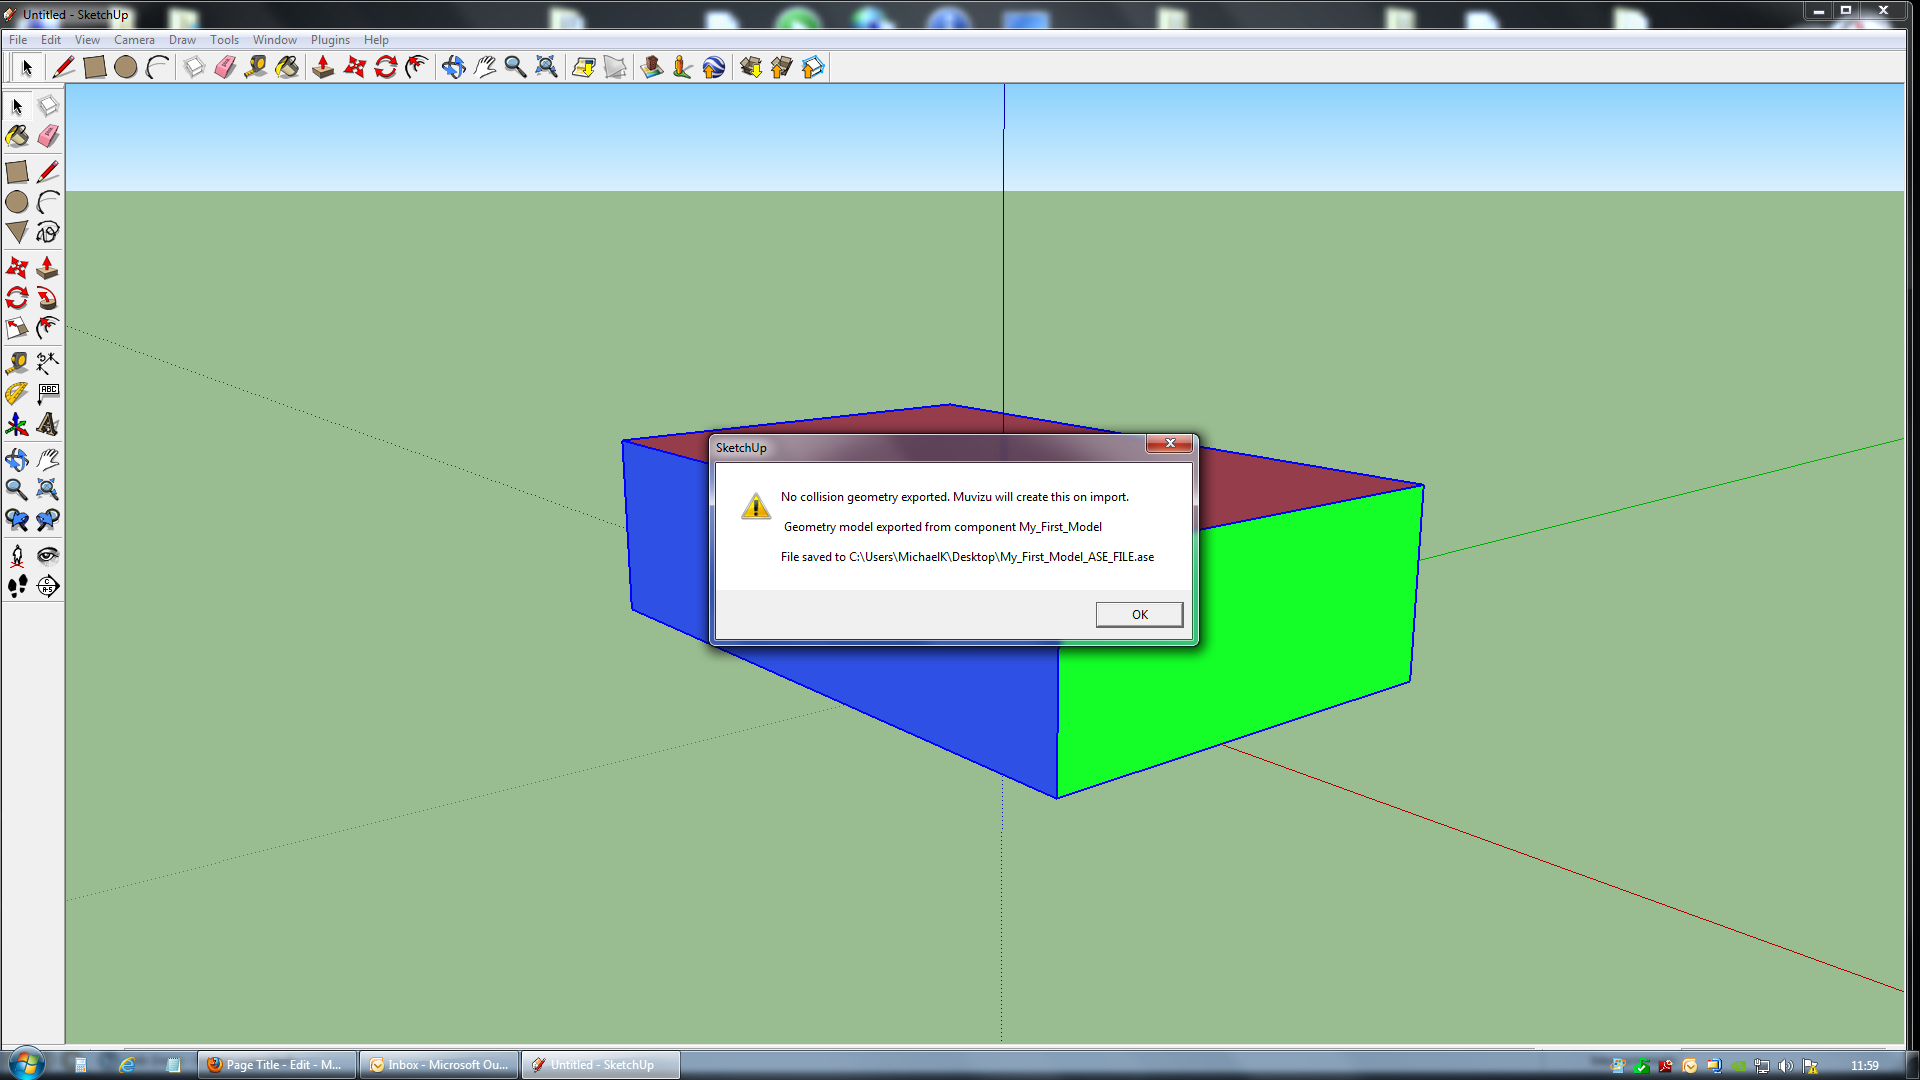
11. After clicking OK, you now have the option to save your model as an ASE file. Call it what you will, but you must add '.ase' at the end of the file name (Or it won't import) I like to name my files like so: MODEL_ASE_FILE.ASE - This way I know what model it is and it's an ASE file.

12. Congrats! Your half way there! A general text box will tell you well done and that Muvizu will generate the collision for your model when you import it and tell you where you have just saved your awesome model.
13. Now you can save your model in Sketchup etc.. and close Sketchup.
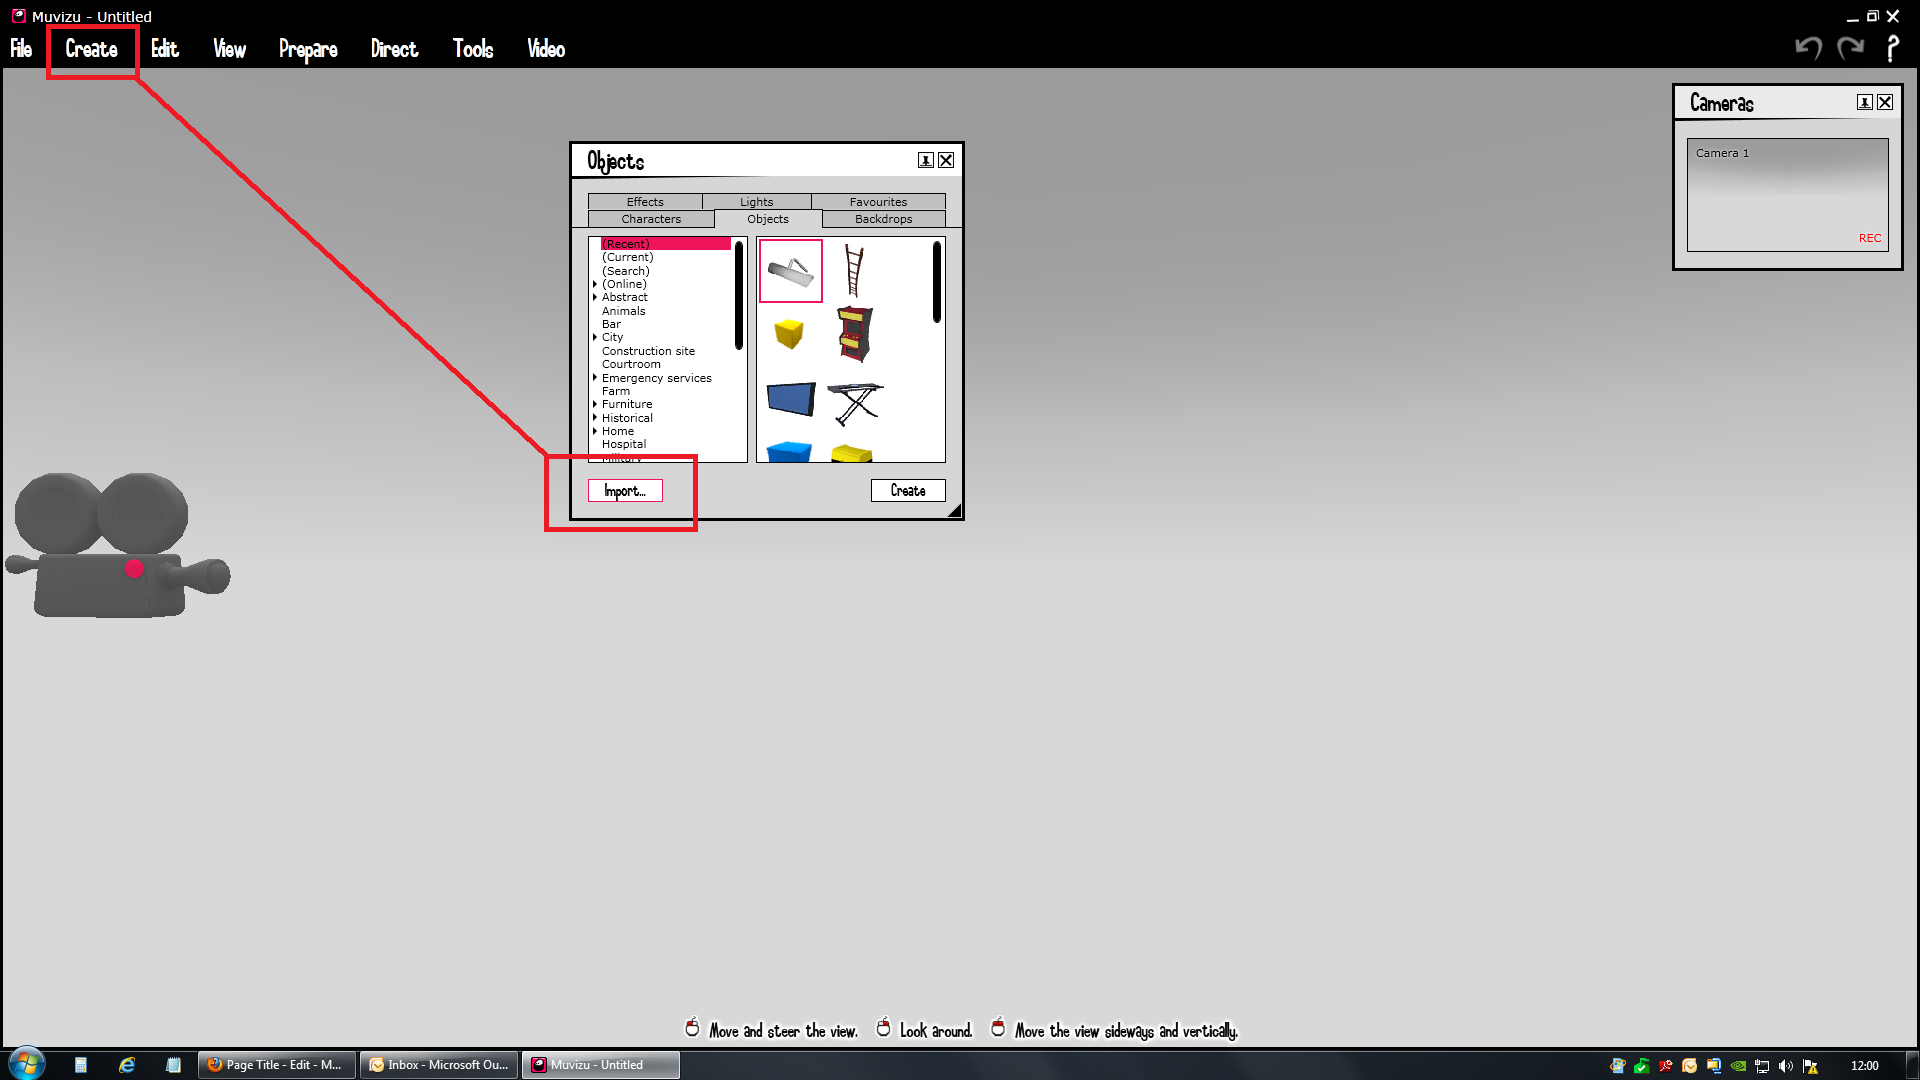
14. Open Muvizu and go to the Create Menu.
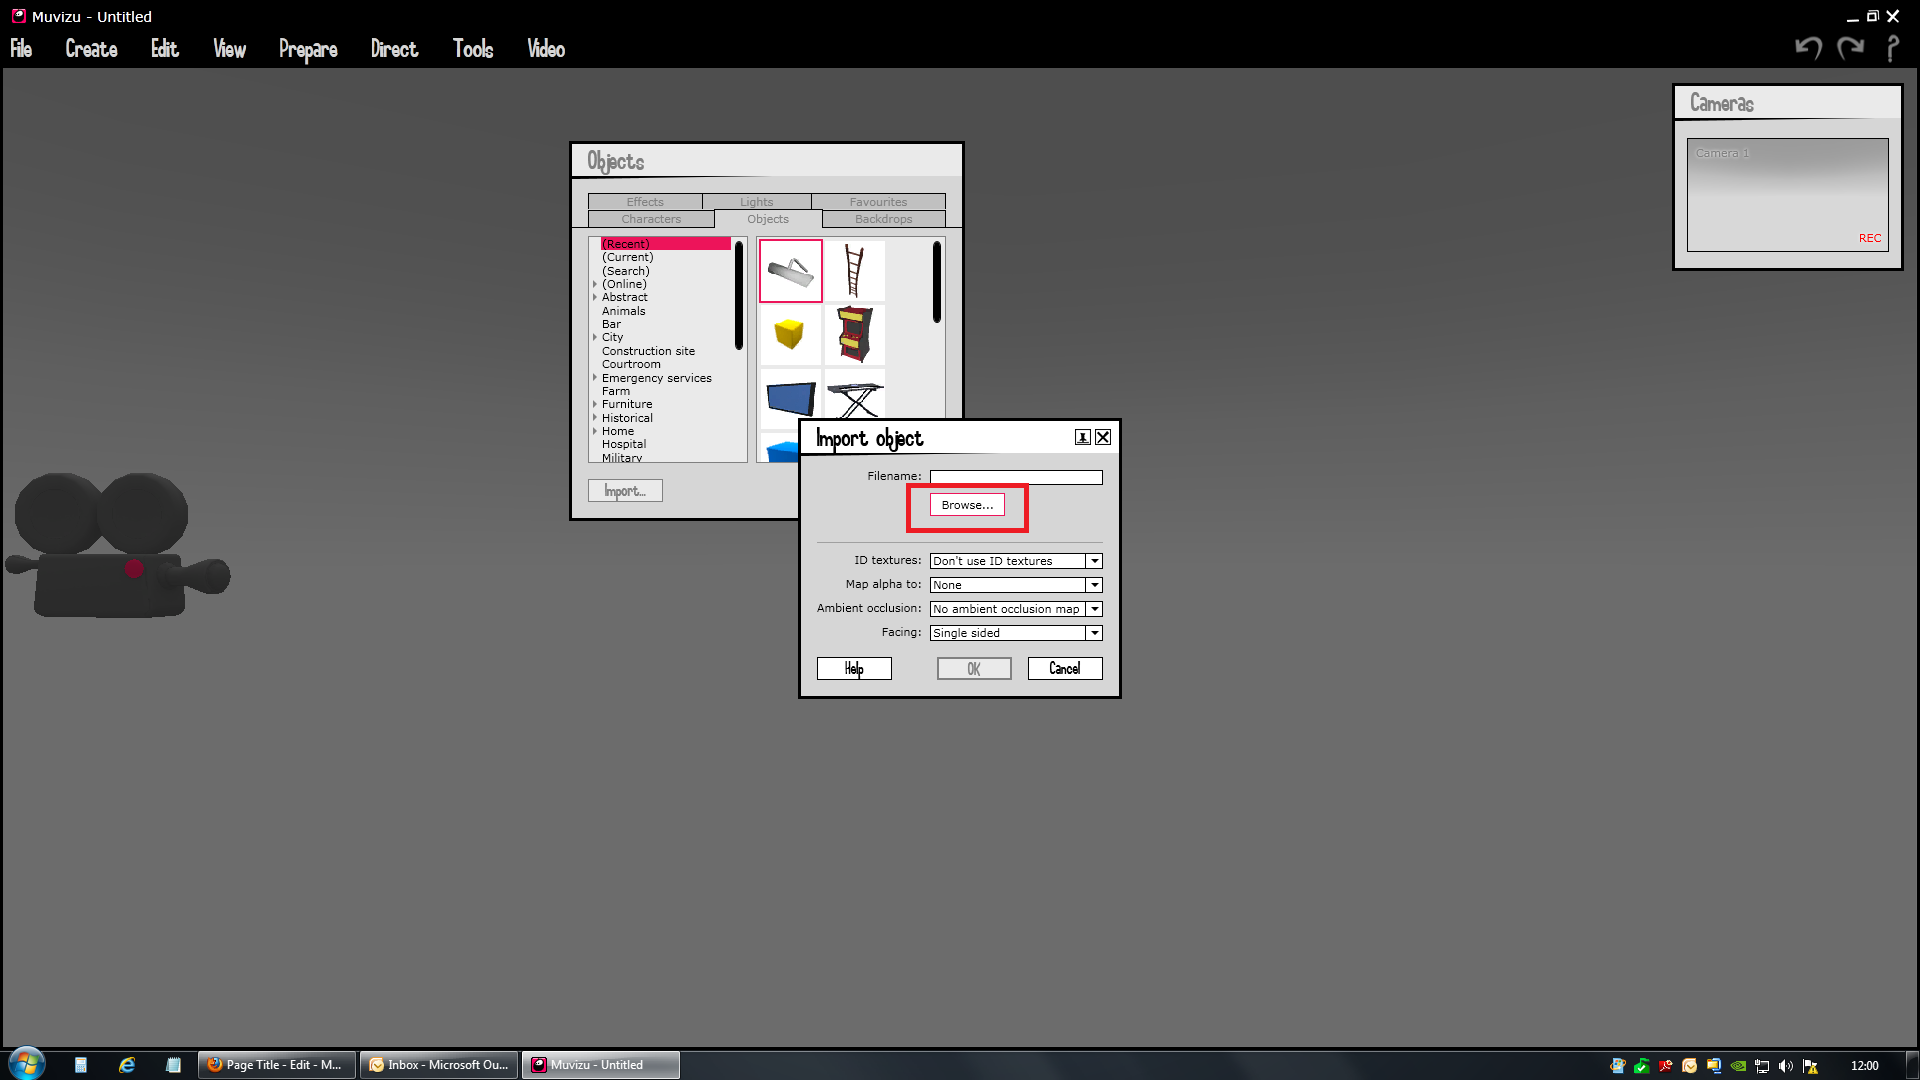
15. Click on Objects and then click Import. (In Muvizu:Play, it is Create then import)
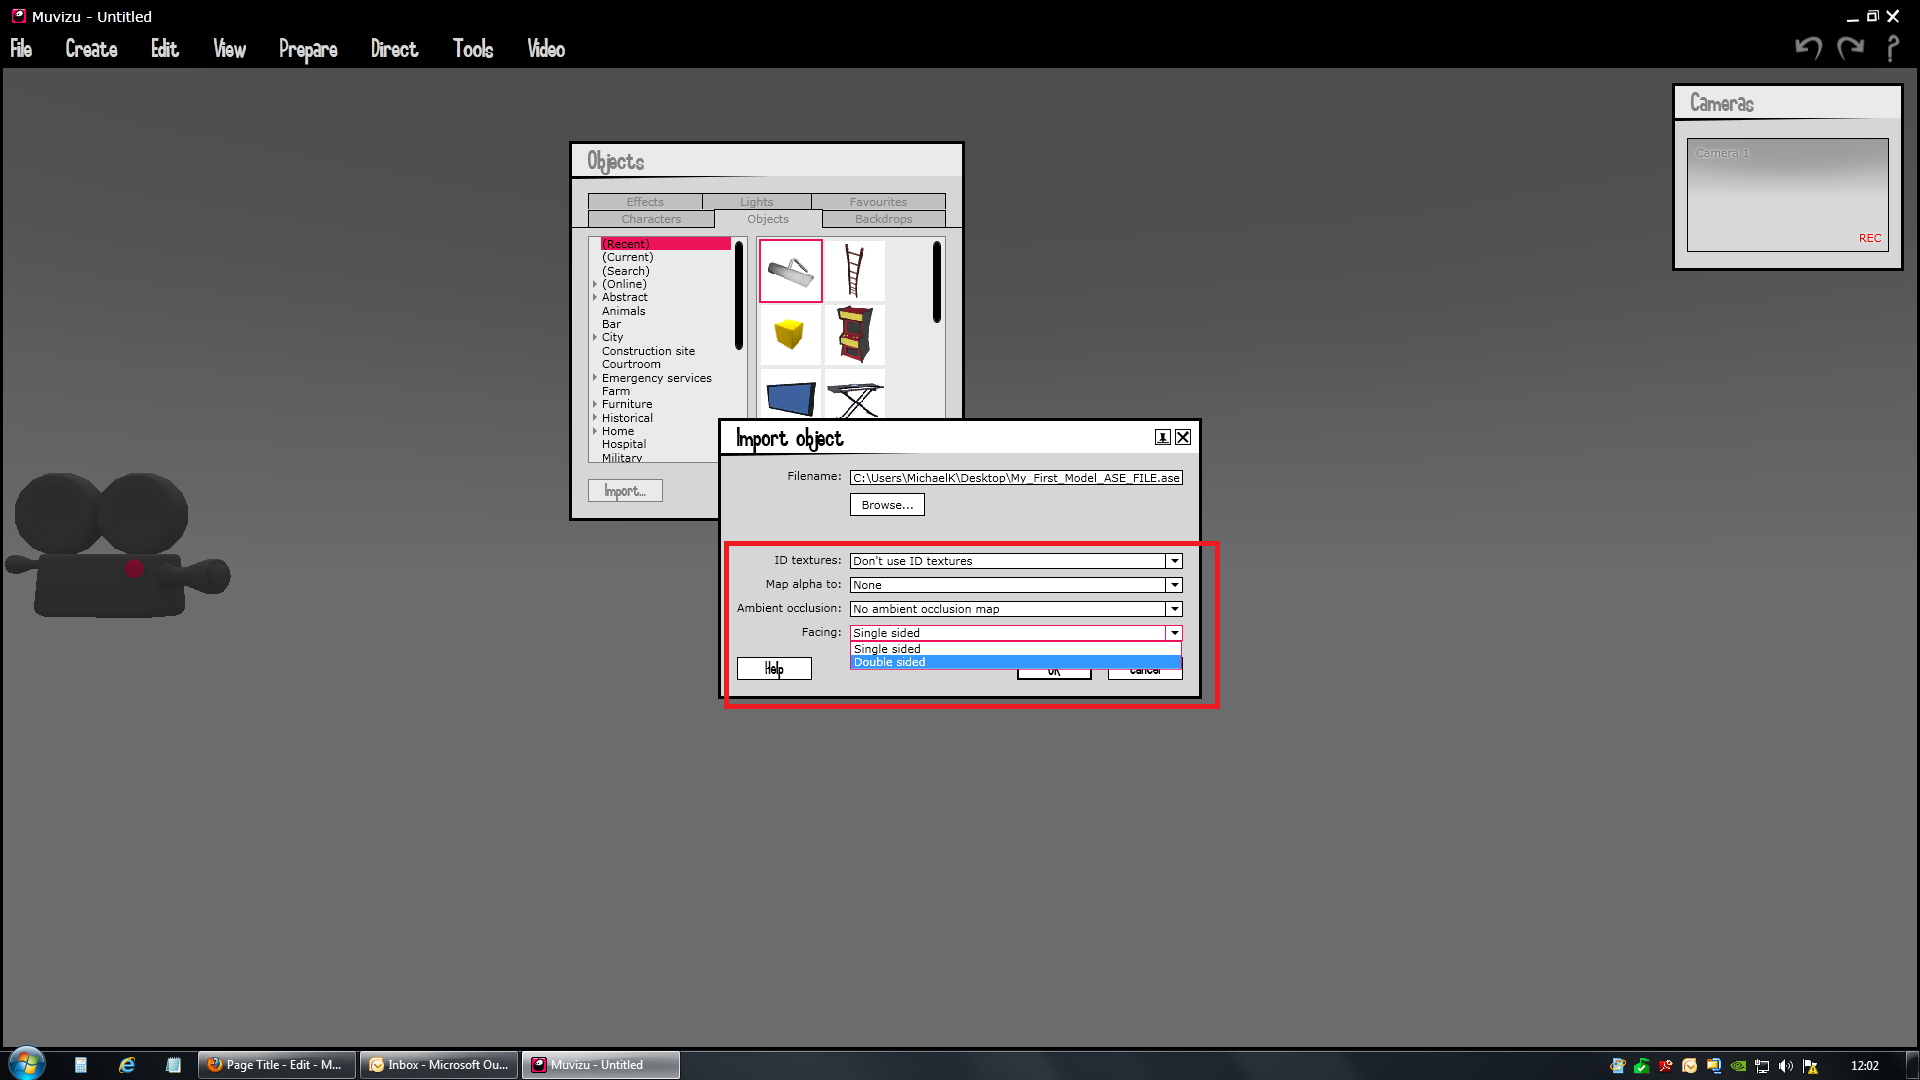
16. Now click Browse and find your ASE file from earlier.
17. I have again selected the simplest options to use here, feel free to mess around with these options once you become a bit more confident with importing. The general options I go for are
- No ID Textures.
- No Alpha Map
- No Ambient Occlusion Map
- Double Sided
18. WOOHOO! You should now have a big cuboid looking at you in Muvizu.
A. From the front (Where we coloured in parts of the shape)
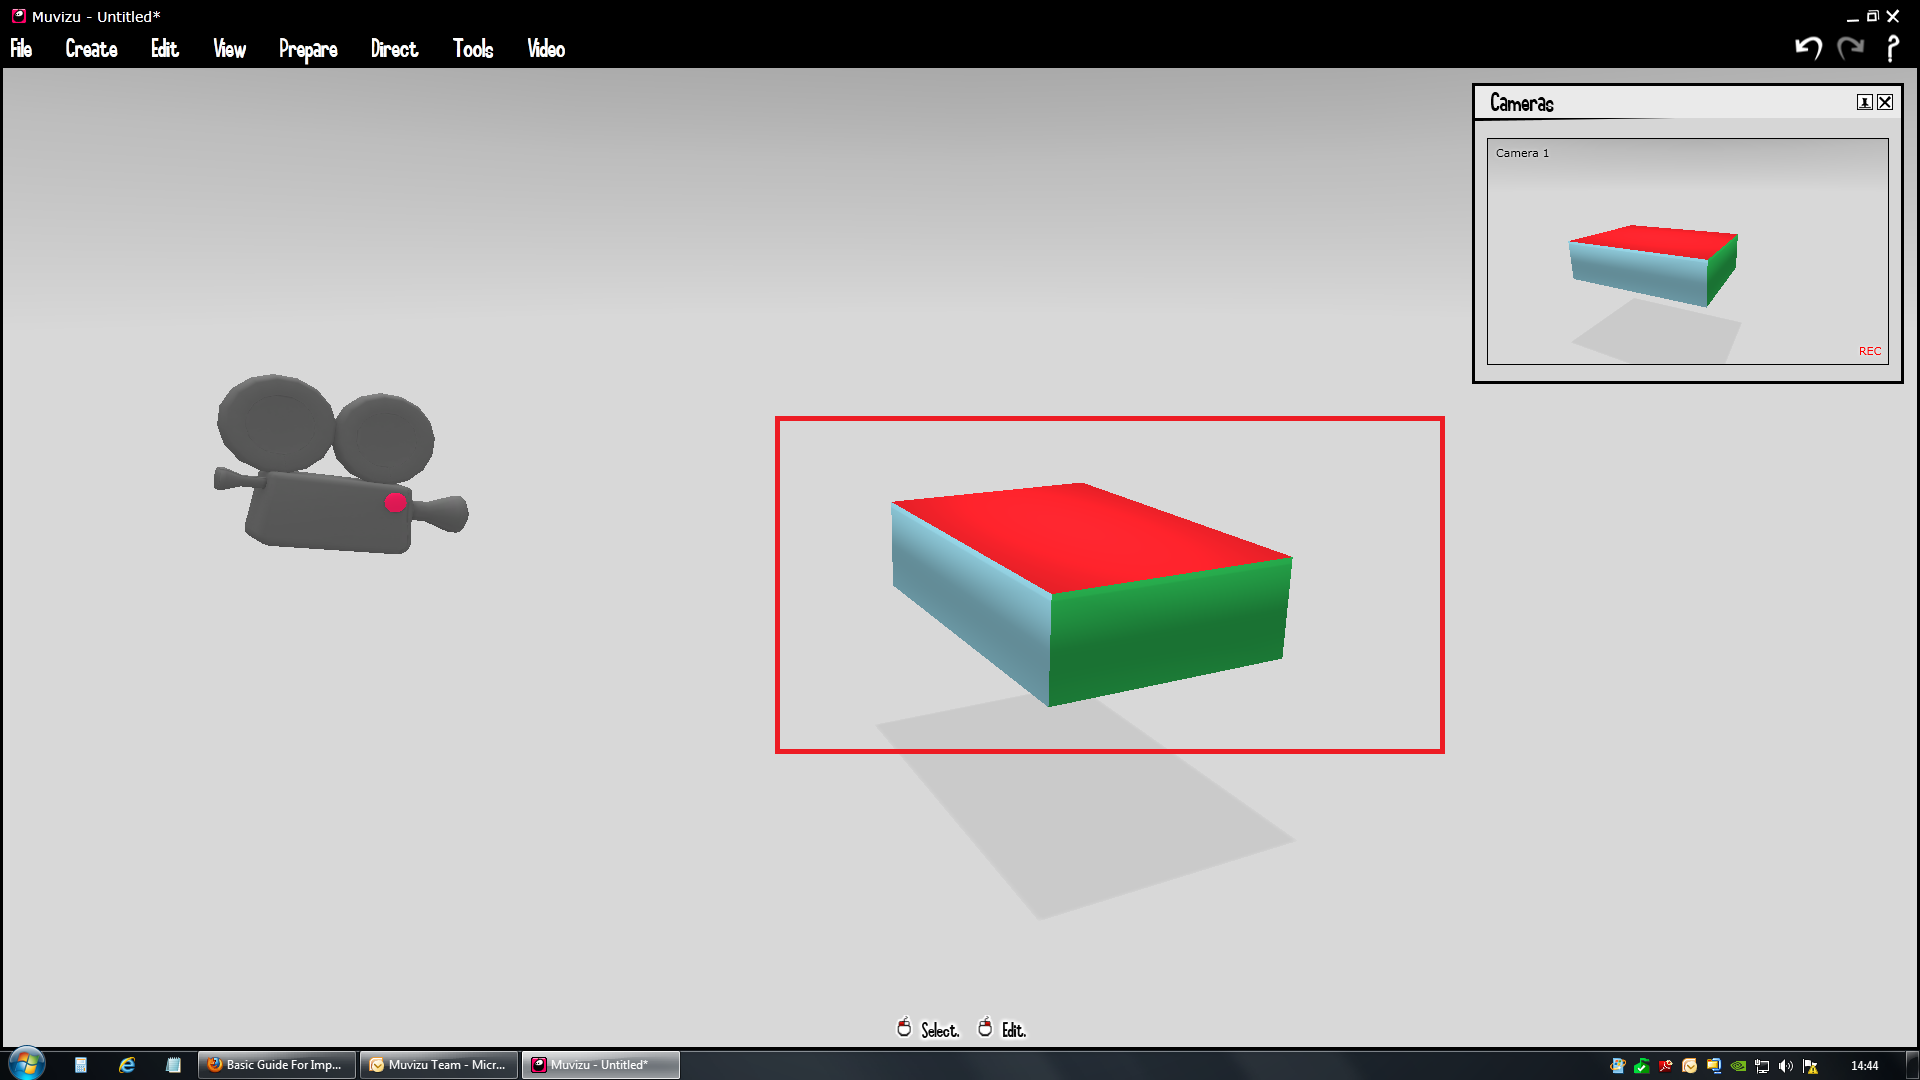
The parts of the model you don't colour with the Paint Bucket in Sketchup will be pink like our Toto.bmp file, like so;
B. From behind (Where we didn't)
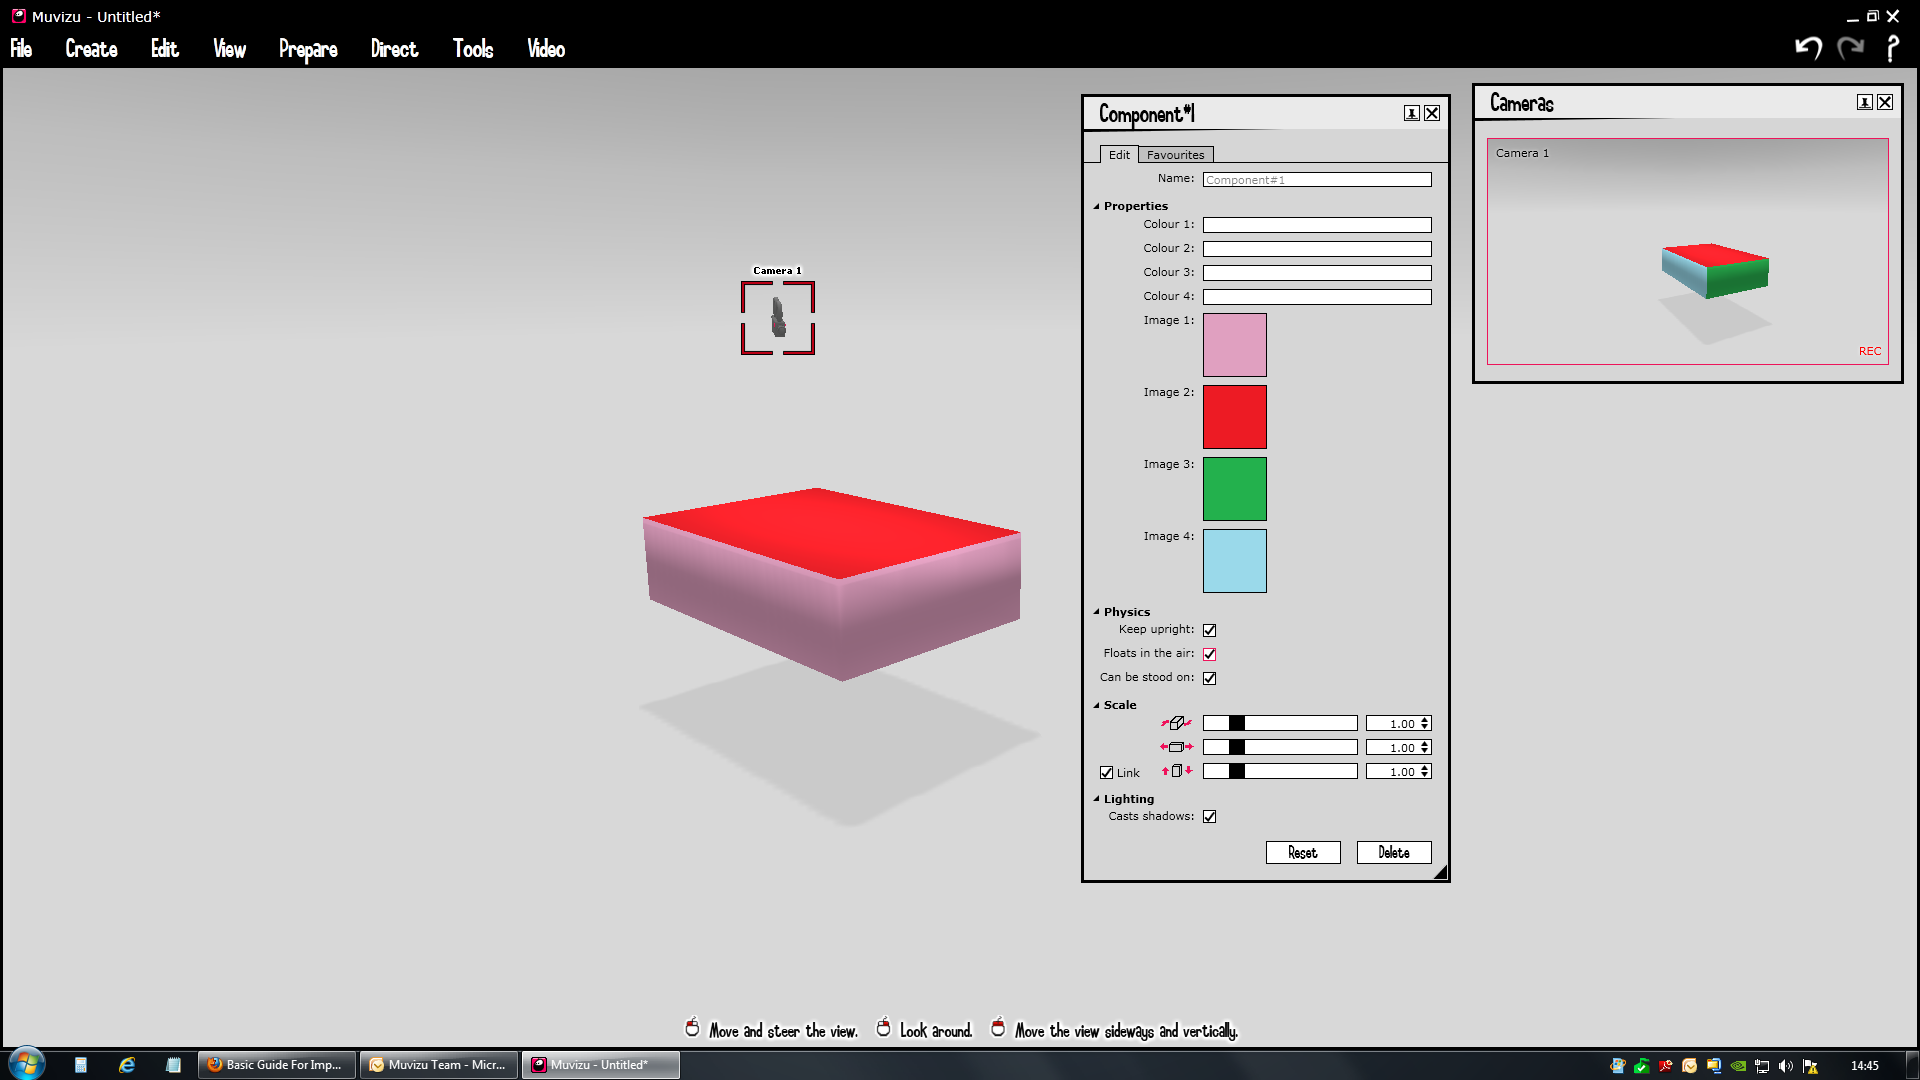
Right click it and it should behave just like any other object from Muvizu and you can name it, re-colour it, make it float and all the other fun stuff as seen in the picture above.
Now go and make more models! Have fun!
Further Reading
There is also more in-depth importing discussions and guides found on the forums, continuing on with a fuller look at more exact collision and other importing techniques and such. Found here:
Importing: http://www.muvizu.com/Video/12838/Importing-from-Sketchup-Part-1
DIY Model Collision: http://www.muvizu.com/Video/12851/Importing-from-Sketchup-Part-2-Basic-Collisio
Complex Collision: http://www.muvizu.com/Video/12935/Importing-from-Sketchup-Part-3-Complex-Collis
Forum Discussion on 3D Importing: http://www.muvizu.com/Forum/forum1486-importing-3d-assets.aspx
Troubleshooting:http://www.muvizu.com/Wiki/wiki/49/importing-custom-objects